Suggested method for managing frequently updated lists (e.g., software, course listings)
- This method creates a list in the WordPress page, that is auto-updated from a working list in Google Sheets
- The WordPress version WILL capture some of the formatting of your Google Sheet, so a minimum font size in Google sheets of 11 pt is recommended (for accessibility standards)
- You can also use Google sheets’ “alternating colors” format (every-other row is lightly-shaded)
- This uses the the WordPress “Custom HTML” Block (which will show up in the Blocks menu (left sidebar) as a “widget” on your the WordPress page you are editing – see the animation at the bottom of this entry). Place the widget where you want the spreadsheet to appear on the WP page.
- The sheets will display better if you include a “height and width code.” If you don’t put in dimensions, you’ll just get a tiny box on your WP page with a bit of the Google Sheet name showing. More info below
Formatting of the WordPress HTML embedding code, including how to control the display height and width of the embedded version on the WP page.
- By following the instructions below, you will copy and paste an embed code provided by the Google Sheet, into the “Custom HTML” block on your WordPress page – this code will begin with <iframe src=
- You MUST add additional formatting instructions near the end of that block of HTML text to display the full width of the Google document on the page, and to control the height (with or without its own scrollbar).
- Here is the form of the recommended addition:
- Blue text is what you will get from copying the Google Embed Code
- Red text is what you should insert before the last </iframe> text.
- Note, there needs to be a single space between =false” and style=
<iframe src=”https://docs.google.com/spreadsheets/d/e/2PACX-1vQ7nNxQIPqG33a8bXeM3Pb_G5vPjySwkJml77WKaEMbCStj2aKsGahLKT1zLiOnWD5nBB5oiWmGIQJY/pubhtml?widget=true&headers=false” style=”height:2400px;width:550px”></iframe>
- Try to fit the full width of the Google document on the WP page, and adjust the height as needed.
- A width of 600 to 800 pixels is a good place to start.
- Then, for a height dimension, use the height-to-width ratio of the original Google Sheet to approximate a starting point for the height dimension (an 8½ x 11 sheet would be embedded at about 650 px height x 500 px width).
- If the full height of your Google sheet is truncated when displayed on the WP page it will have its own interior scroll bar (inside the page scrollbar). If desired, play with the height dimension to eliminate the interior scroll bar.
(from the WordPress Guide on using Google Docs):
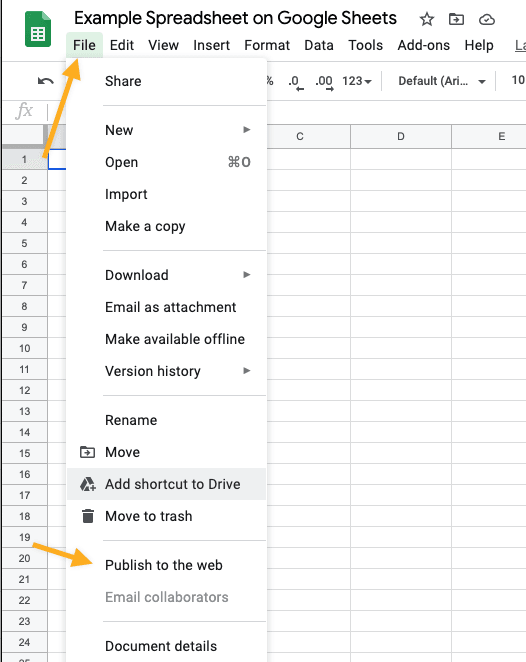
To embed a Sheet from Google Docs, open the spreadsheet you want to embed and click on the Publish to the Web link under the File menu.
Caveats to the info below:
Only publish one specific worksheet at a time, NOT “Entire document”
When setting sharing permissions do NOT restrict sharing to just U-M Community
Click the Publish button. Then click Embed and copy the code.

Paste the embed code into a Custom HTML block and it will show up on your page or post. For security reasons, not all HTML tags are allowed in the Custom HTML Block. Please check the list of supported HTML tags for the ones you can use.

Edit embedded spreadsheets
If you’re embedding a spreadsheet, you can show or hide parts of the spreadsheet after you publish to the web.
- Open a file in Google Sheets.
- At the top, click File
Publish to the web.
- In the window that appears, click Embed.
- Click Publish.
- Copy the code in the text box and paste it into your site or blog.
- To show or hide parts of the spreadsheet, edit the HTML on your site or blog.
gid=: The sheet ID.range=: The rows and columns that are published to the web. For example, A1:B14.widget=: True or false. If true, the sheet tab is displayed at the bottom.headers=: True or false. If true, row numbers and column letters are displayed.chrome=: True or false. If true, the title and footer are displayed.